
LX DDR3/DDR2
LX DDR3
LX DDR2
LX DDR1
RAMCHECK LX Adapters
PC Communication
Product FAQ
Which System Is For Me?
Why Buy From Us?
Why Test Memory?
Int'l Distributors
How to Purchase
Tech Support
Service & Upgrades
Manuals
Software Downloads
FAQ
Site Map
Home
Contact us at
(281) 879-6226
sales@innoventions.com
The RAMCHECK LX memory tester for repairing defective DIMM and SODIMM modules by pinpointing the defect and identify the defective chip. Of course, the first thing you need to do is test the suspect module to confirm that it is faulty. This takes just a few seconds with RAMCHECK LX.
RAMCHECK LX will quickly identify the module's speed, size and type, and give a pass/fail message. RAMCHECK LX error messages also generally identify the relevant pins (circuit connections to the test socket) of the module being tested which are associated with the problem. It is designed to provide you with explicit error data to enable you to identify the defective component(s) on the module.
Spotting the Defective Memory Chip
Every memory module has chips that are arranged from left to right (when you look at rank 1) in accordance with the bits (each bit has a DQ number) of the module. RAMCHECK LX data errors clearly identify the DQ bit/s which are bad and it tells you which chips are being used. You can easily identify the bad chip from the RAMCHECK LX data errors as follows.
The most popular modules (regardless of size and DDR1/2/3 type) use individual chips with x8 data width. Therefore, x64 module uses 8 such chips per rank and ECC (x72) uses 9 chips. The first chip on the left always connects to DQ0-7. The second chip connects to DQ8-15, the third chip from the left connects to DQ16-23, and so forth. The ECC chip (for DQ64-71), if available, is placed in the middle of the module as the 5th chip, as shown in the following drawing.
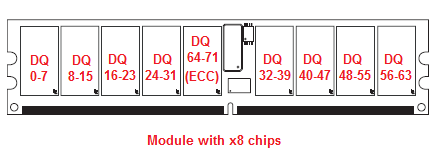
For example, if RAMCHECK LX reports the error DQ17 bad, you know it is the third chip (DQ16-23) from the left.
Similarly, an x64 data width module (regardless of size) that uses x16 data width individual chips, has 4 chips per rank. The first chip on the left always connects to DQ0-15. The second chip connects to DQ16-31, the third chip from the left connects to DQ32-47, and so forth. So if for example RAMCHECK LX reports the error DQ30 bad, you know it is the second chip.
Similarly, a x64 module with x4 also have a regular orderly arrangement and your technician can easily convert the RAMCHECK LX error report to identify the chips.
Please review APPENDIX E - MODULE REPAIR WITH RAMCHECK for a more in-depth explanation. (PDF file)
*******************************************************
You will need the data sheet for the module. Find the manufacturer and the part number of the device. A small white label should be affixed to the module which includes the part number, and the manufacture
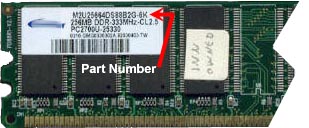 r's name should be printed on
the PCB (see figure A ). Next, go to the manufacturer's
web site. (If you don't know what the URL is, type the
company name into the search box at Google or Yahoo). Most
manufacturers allow you to search by part number. If not,
by selecting the right product categories you should be
able to quickly navigate your way to the correct data
sheet, which is typically a PDF file. Still not having
luck finding it? Search for the part number on Google or Yahoo. The data
sheets may no longer be linked from the company's web
site, but the search engines may still have the link in
their archives. If all else fails, you can use a
continuity meter from the pin identified by RAMCHECK to
find the connected chip.
r's name should be printed on
the PCB (see figure A ). Next, go to the manufacturer's
web site. (If you don't know what the URL is, type the
company name into the search box at Google or Yahoo). Most
manufacturers allow you to search by part number. If not,
by selecting the right product categories you should be
able to quickly navigate your way to the correct data
sheet, which is typically a PDF file. Still not having
luck finding it? Search for the part number on Google or Yahoo. The data
sheets may no longer be linked from the company's web
site, but the search engines may still have the link in
their archives. If all else fails, you can use a
continuity meter from the pin identified by RAMCHECK to
find the connected chip. 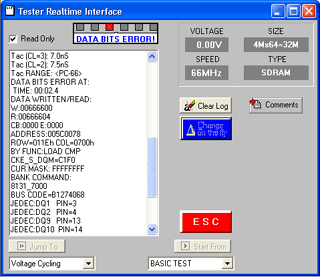
Now that you know where the defective chip is you'll have to replace it. Only a technician with component-level repair expertise can repair a memory module. The required soldering/ desoldering equipment is relatively complex, especially with modules and cards made with extremely thin Surface Mount technology (i.e., devices with TSOP
 chips).
You will need a good deal of practice with desoldering
techniques. Nevertheless, a few minor problems, which are
identified by RAMCHECK, can be repaired with simple tools.
A short between an adjacent pin may be caused by a small
piece of metallic debris, which is stuck between two
chips. You "repair" the module in this case with an Exacto
knife or a watchmaker's fine screwdriver by simply
removing the debris. If you use RAMCHECK in the production
shop, you should be able to easily replace the module's
components.
chips).
You will need a good deal of practice with desoldering
techniques. Nevertheless, a few minor problems, which are
identified by RAMCHECK, can be repaired with simple tools.
A short between an adjacent pin may be caused by a small
piece of metallic debris, which is stuck between two
chips. You "repair" the module in this case with an Exacto
knife or a watchmaker's fine screwdriver by simply
removing the debris. If you use RAMCHECK in the production
shop, you should be able to easily replace the module's
components. Repairing memory does involve a fair amount of work, but as companies around the world have discovered with RAMCHECK, it can be a lucrative business.
Other Resources:
New structure analysis for RAMCHECK test results - important for memory module repair.
How to Desolder
Desoldering tools
(Note: Our older SIMCHECK II tester was designed for EDO/FPM technology. While it was upgraded for SDRAM testing, it has only limited error detail reporting capabilities with SDRAM modules.)
Other articles in this series:
How to repair RAM
Selecting a memory tester
How to test memory
Quality of Memory - Remarked versus marked, brand name vs no name
What is the SPD and how to program it
Evolution of memory