Thank you for visiting the RAMCHECK web
site, the original portable memory tester.
Introducing the DDR4 260-PIN SODIMM Test Head
The RAMCHECK LX DDR4 260-pin SODIMM Test Head (p/n INN-8686-18-2) extends the capabilities of the DDR4 Series Adapter so you can test popular DDR4 260-pin SODIMM modules, both ECC and non-ECC, that comply with JEDEC standards.
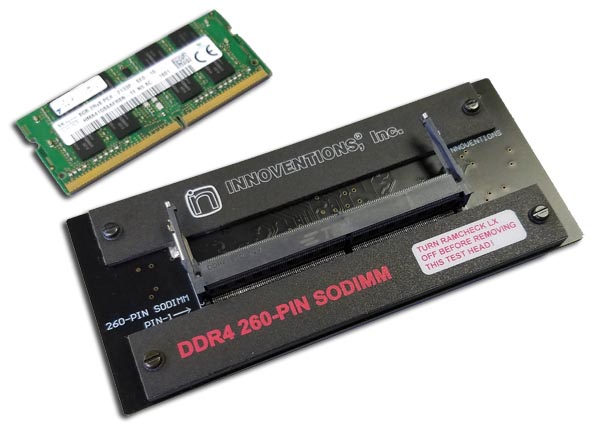
The DDR4 260-pin SODIMM test head is mounted on the DDR4 Series adapter instead of the 288-pin DIMM test head that comes with the adapter. It uses the existing RAMCHECK LX base tester, making it a very cost-effective solution for testing DDR4 SODIMM modules:
NOTE: The DDR4 Series adapter will not work with the older RAMCHECK base tester p/n INN-8668. However, we do offer a low-cost factory conversion for RAMCHECK to RAMCHECK LX, so your investment in the older RAMCHECK is not obsolete.
No special setup is required. As with all of our other RAMCHECK LX adapters, each module's size, structure, and type are automatically detected, without the need for complicated setup. The tests follow our standard Basic Test, Extensive Test, and Auto-Loop process. The RAMCHECK LX DDR4 260-pin SODIMM test head is very simple to operate. Little training is required.
The DDR4 series adapter connects to RAMCHECK LX via the two top 90-pin and 50-pin expansion slots. Turn the RAMCHECK LX OFF and carefully mount the DDR4 series adapter onto the RAMCHECK LX expansion slots, while pressing it gradually on both sides. To test other devices with optional adapters you must turn RAMCHECK LX OFF and remove the DDR4 adapter by gradually pulling it up on both sides, taking care not to flex the adapter's boards.
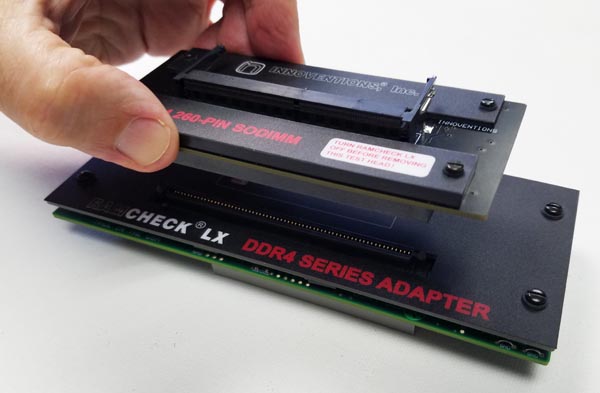
You can connect or remove the SO-DIMM test head from the DDR4 series adapter when the adapter is not mounted on RAMCHECK LX. You may also replace the SO-DIMM test head while the adapter is mounted on the RAMCHECK LX, provided that RAMCHECK LX is turned off.
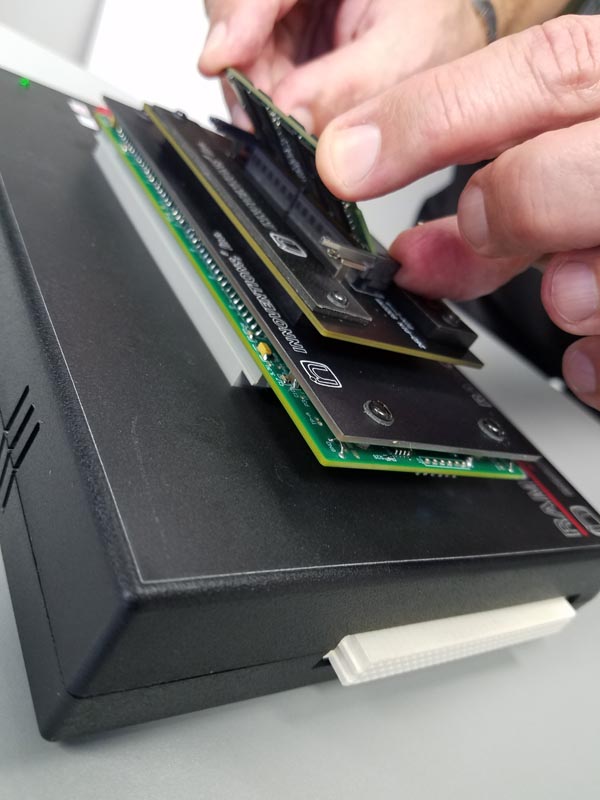
The DDR4 Series Adapter has two 130-pin sockets to accept the various test heads. Notice in the following picture that each socket has a wide peg on the left side and a narrow peg on the right side:
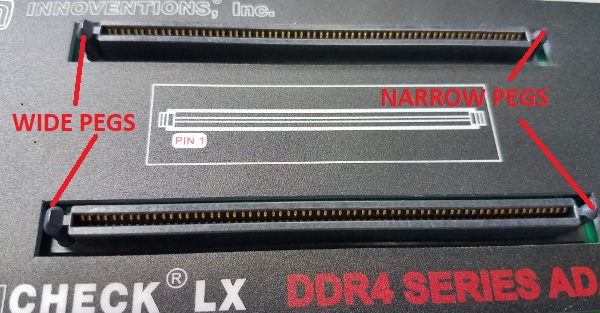
The Test Head has two 130-pin connectors that have wide corresponding holes on the left side and narrow holes on the right side. Therefore, the test head can be mounted only in the correct direction. When mounting the test head, press it gradually and simultaneously above both sides of these 130-pin connectors.
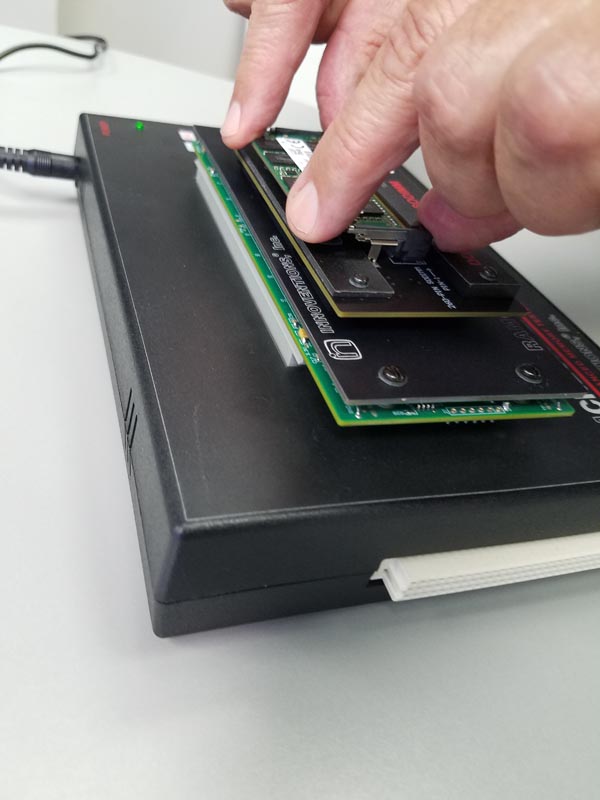
The SODIMM socket requires surprisingly little force to insert or remove the SODIMM modules. There are two steps required to insert the module. In the first step, the module is carefully inserted at an angle of about 30 degrees into the socket. Notice that the SODIMM module has a notch on its connection edge allowing it to be inserted only in the correct direction (module front face pointing up).
In the second step, when the module is inside the socket and aligned straight with the socket, carefully push it down with both hands so that it locks into horizontal place with the two side ejectors:
Removing the module requires pulling the ejectors outside, carefully lifting the module to the insertion angle, and finally pulling the module out. Please follow the instructions on extending the life of the SODIMM socket detailed below.
 |
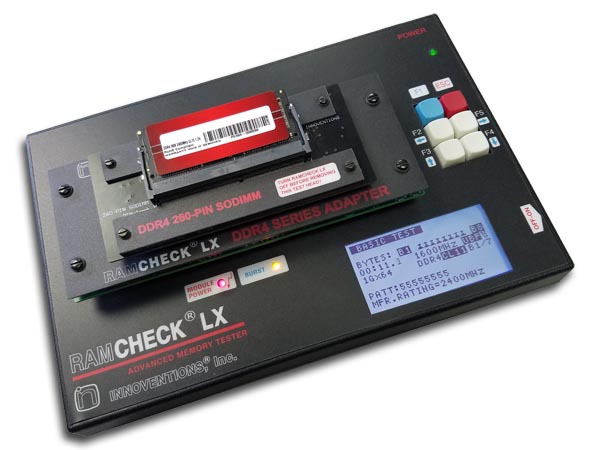
The RAMCHECK LX automatically recognizes the DDR4 Series adapter and the SODIMM test head. Seen here is the startup screen once the RAMCHECK LX DDR4 tester is turned on, detecting the 260-pin SODIMM test head. |
|
Rapidly pressing the ESC button several times during STANDBY brings the adapter configuration screen. It is showing the 260-pin SODIMM test head configuration and the DDR4 Series adapter's temperature. |
|
STANDBY mode is when the power is off and you can insert and remove the DDR4 SODIMM modules. Never insert or remove modules when the red Module Power is ON! |
| Basic Test | |
 |
The Basic Test screen shows the size, test time, speed, voltage, structure, test pattern, the module's rank/bank, CAS Latency and more. In this screen you will see it testing a 1GBx64 non-ECC unbuffered SODIMM module. The SODIMM structure is '2Rx8', made from two ranks of x8 memory chips. |
 |
This screen shows the test voltage as 1.20V. The Basic Test screen also shows the time of test, as well as the section of the module currently under test. B1/3 means Rank1, Bank3 in this example. |
 |
The first line of the Basic Test screen shows an animation as the test process scans the memory array. The actual frequency of the DDR4 Series adapter test is shown below the test animation line. |
|
The RAMCHECK LX tester displays the module manufacturer's official speed rating on the bottom line. The manufacturer will specify the speed rating based upon expensive and very complex certifying test equipment. Here is another module which is specified for 2400MHz. |
 |
This screen shows another module undergoing test, this time an Unbuffered 1Gx72 ECC DIMM. The current pattern is "55555555" while the pattern shown in a previous screens was "AAAAAAAA". |
 |
This screen shows the test of a large 32GB DDR4 module. It is a Registered 4Gx72 ECC DIMM. The module consists of two ranks of x4 memory chips (2Rx4 structure). |
 |
A successful test phase concludes with a clear 'Pass' message as well as sound tones. The important parameters are shown in this screen, which is followed by a detailed test results summary screen. |
| Test Results | |
 |
Test results summary screens provide a wealth of information after each test phase. This screen provides a summary of the module's speed. |
 |
This summary screen includes structure information. The tested module is identified as DDR4 260p unbuffered. The test log includes all of the summary screens. |
 |
The test Log collects and retains all of the intermediary test results, while the memory undergoes all of the test phases. The Test Log remains until a new test is started. Each Test Log can be printed via the USB/PC software interface, and you can also save the file. |
 |
This screen is part of the detailed structure information detected by the RAMCHECK LX. It reports the ranks number and the SODIMM type. |
 |
It shows the module ID (s/n), as well as information about the temperature sensor inside the module's SPD chip. It reports successful connector wiring test, data wiring test and DQS wiring test. |
 |
This screen shows the final temperature during the Basic Test, as well as the timer reading. It also lists the manufacturer's speed rating. |
 |
This screen summarizes the size data captured for the 1GBx72 8GB SODIMM module. The 1Rx8 module uses 1Gx8 DDR4 memory chips, with 16 banks and 16 row/10 column addressing. |
| Extensive Test | |
 |
The Extensive Test performs a number of tests to determine the quality of the memory. |
| Extensive Test | |
|
The EXTENSIVE Test performs a number of tests to determine the quality of the memory. |
 |
VOLTAGE CYCLING performs tests under allowable voltage deviations from the recommended VDD setting. |
 |
VOLTAGE BOUNCE tests data retention during voltage variations between read and write. For DDR4, bouncing is done between 1.14V to 1.26V, spanning the recommended VDD range. |
 |
CHIP HEAT MODE tests at elevated operating temperatures. This module is tested at the top recommended voltage for DDR4 (1.26V), while the program exercises all of the module's ranks. |
 |
The FINAL TEST repeats the general Basic Test at the end of the Extensive Test flow. |
 |
A successful Extensive Test concludes with a clear 'Pass' message and unique tones. The important parameters are shown in this screen. |
 |
TEST LOG The Test Log lists the results of all the phases of the Extensive Test. |
 |
In this screen, the Test Log completes listing the results of all the phases of the Extensive Test. |
| Auto Loop | |
 |
AUTO LOOP tests memory with endless pattern changes. It's great for burn-in testing. Screens for this test will be added soon once enabled. |
| Change-on-the-fly and Setup | |
 |
Expanded CHANGE-ON-THE-FLY can be used to set up the Frequency, Voltage, CAS LATENCY and the Refresh rate only for the current test. Following the current test, it returns to the current setup parameters. |
 |
CAS Latency can be set at 9-24. The write CAS Latency (CWL) is dependent on the read CL, as shown. Please note that not all DDR4 modules support all CL values. |
 |
The DDR4 VDD Voltage setup allows the user to change the test voltage in the range 1.14V-1.26V "on-the-fly." When set to AUTO, RAMCHECK LX automatically tests the module at 1.20V. In this example, the user selects a VDD of 1.24 Volt. |
| Wiring Errors Detection | |
 |
DDR4 devices utilize the differential DQS technique, which assigns a pair of two control lines per each DQS. In this example, DQS0 line (pin 153) was stuck at 0. |
 |
Address lines errors in the DDR4 modules are reported explicitly in this example. Here address line A9 (pin 66) is shorted to ground. |
 |
Data line errors in DDR4 modules are reported explicitly as shown in this example. Here data line D30 (pin 43) is shorted to VDD. |
 |
The DDR4 module uses ODT control lines to activate the internal Rtt termination resistors. In this test error example, line ODT1 (pin 91) is shorted to ground. |
| SPD Editor | |
 |
The device's SPD can be conveniently viewed, edited and programmed on the RAMCHECK LX. You can also use the advanced SPD features in the PC RAMCHECK LX communications program. |
The RAMCHECK LX DDR4 adapter can perform DDR4 tests at actual test frequencies up to 1600MHz. All DDR4 Modules designed for higher frequencies (DDR4-3200, DDR4-2666, DDR4-2400, DDR4-2133 and DDR4-1866) can be functionally tested on the DDR4 Series adapter but at a reduced frequency.
Please inspect the test socket peridically to verify that the socket contacts are clean and that there are no debris inside the socket. If needed, clean the contacts with NON-RESIDUE electronic contact cleaner (like the "BLUE SHOWER" brand we use extensively at INNOVENTIONS) or using compressed air. Never use WD40 or any other oily materials to clean the socket!
If needed, use a soft small painter's brush (with extra soft whiskers) and isopropyl rubbing alcohol (50%-70%) to clean the contacts. After soaking the brush in the alcohol, run it carefully up and down the test socket several times. WARNING: make sure not to apply any strong force on the contacts in the left-right direction (i.e. along the length of the socket), as excessive force may break the contacts.
The time period between socket cleaning is subject to your specific use and testing load and should be determined empirically. Always make sure that the modules you insert to the test socket have clean contacts! You can use the same rubbing alchohl or "Blue Shower" contact cleaner to clean the module's contacts, if needed. We also found that clean pencil erasers can clean a module's contacts very effectively.
When ordering this test head, please reference part number INN-8686-18-2.
Note: The DDR4 Series adapter and this SODIMM test head only work with the RAMCHECK LX.
It does not work with our prior-generation RAMCHECK base tester.
If you own the older RAMCHECK tester, please contact us for conversion or trade-in offers, or
call INNOVENTIONS at 1 (281) 879-6226.