
Thank you for visiting the RAMCHECK LX website, home of the original portable memory tester.
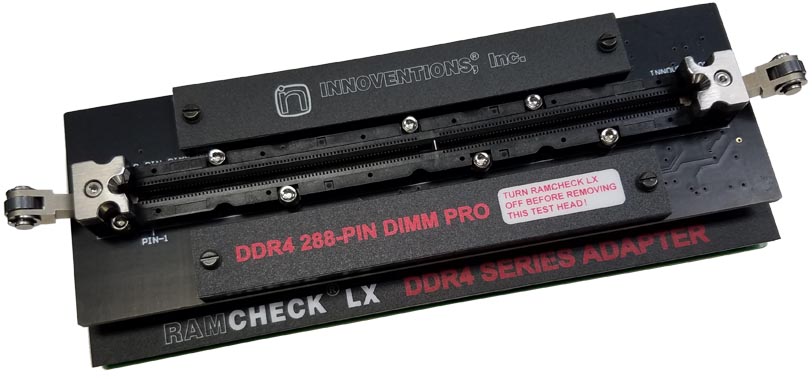
DDR4 Series 288-pin DIMM PRO Test Head
The new DDR4 288-pin DIMM PRO Test Head (p/n INN-8686-18-8) includes a high-quality, rugged, high-volume test socket. Unlike the "YAMAICHI" brand test sockets used in our previous DDR3, DDR2 and DDR1 adapters, the DDR4 PRO's new "MCS" test socket is designed for lower insertion force. As a result, the contacts of this socket are more delicate than the YAMAICHI contacts, yet with proper handling, the MCS sockets should last longer.
This page provide tips that will enable you to extend the life of the socket.
Please inspect the test socket peridically to verify that the socket contacts are clean and that there is no debris inside the socket. If needed, clean the contacts with NON-RESIDUE electronic contact cleaner (like the "BLUE SHOWER" brand we use extensively at INNOVENTIONS) or using compressed air. Never use WD40 or any other oily materials to clean the socket!
If needed, use a soft small painter brush (with extra soft whiskers) and isopropyl rubbing alcohol (50%-70%) to clean the contacts. After soaking the brush in the alcohol, run it carefully up and down the test socket several times. WARNING: make sure not to apply any strong force on the contacts in the left-right direction (i.e. along the length of the socket), as excessive force may easily break the contacts.
The time period between socket cleaning is subject to your specific use and testing load and should be determined empirically. Always make sure that the modules you insert into the test socket have clean contacts! You can use the same rubbing alcohol or "Blue Shower" contact cleaner to clean the module's contacts, if needed. We also found that clean pencil erasers can clean module's contacts very effectively.
The DDR4 series adapter connects to the RAMCHECK LX via the two top 90-pin and 50-pin expansion slots. Turn RAMCHECK LX OFF and carefully mount the DDR4 series adapter onto the RAMCHECK LX expansion slots, while pressing it gradually on both sides. To test other devices with optional adapters you must turn RAMCHECK LX OFF and remove the DDR4 adapter by gradually pulling it up on both sides, taking care not to flex the adapter's boards.
You can connect or remove the test head from the DDR4 series adapter when the adapter is not mounted on RAMCHECK LX. You may also replace the test head while the adapter is mounted on the RAMCHECK LX, provided that RAMCHECK LX is turned off.
The DDR4 Series Adapter has two 130-pin sockets to accept the various test heads. Notice in the following picture that each socket has a wide peg on the left side and a narrow peg on the right side:
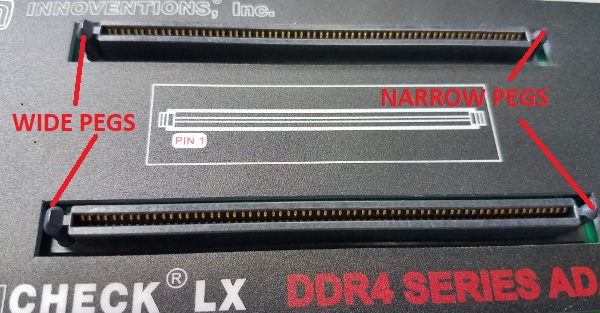
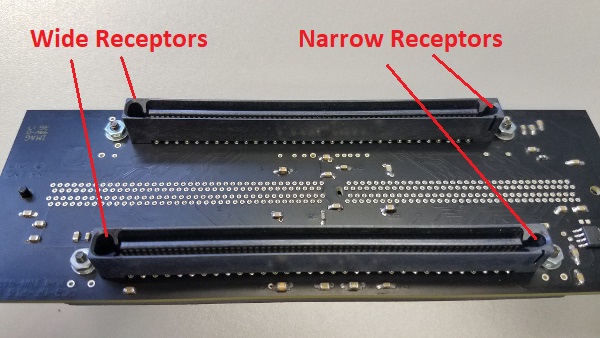
The Test Head has two 130-pin connectors that have wide corresponding holes on the left side and narrow holes on the right side. Therefore, the test head can be mounted only in the correct direction. When mounting the test head, press it gradually and simultaneously above both sides of these 130-pin connectors.
The following picture shows how to remove the test head from the DDR4 series adapter. Hold the test head with both hands and gradually lift the test head while simultaneously pulling up from both sides of the device:

The DDR4 series adapter connects to RAMCHECK LX via the two top 90-pin and 50-pin expansion slots. Turn RAMCHECK LX OFF and carefully mount the DDR4 series adapter onto the RAMCHECK LX expansion slots, while pressing it gradually on both sides. To test other devices with other optional adapters, you must turn RAMCHECK LX OFF and remove the DDR4 series adapter by gradually pulling it up on both sides, taking care not to flex the adapter's boards.
CAUTION: Plug this adapter into the expansion slots only when RAMCHECK LX is OFF! Failure to turn RAMCHECK LX OFF when connecting or disconnecting the DDR4 series adapter or its test head may result in damage to the internal chips of both the RAMCHECK LX and/or the DDR4 series adapter!
CAUTION: Please let the adapter COOL DOWN for at least 1 minute before attempting to remove it from RAMCHECK LX. Removal of the adapter while it is still hot may impair some of the soldered connections of its delicate internal parts!
You can monitor the adapter's internal temperature by quickly pressing the ESC button two times during STANDBY mode:
INSERTION: The 288-pin DIMM PRO test head uses a vertically mounted test socket with two ejectors. Carefully insert the DDR4 DIMM into the socket, pushing it evenly along its top. Pin 1 of the module should point to the left side (as marked on the test head), so that the key area of the module's connector is correctly aligned with the key area in the test socket. When the DIMM is properly inserted, you will feel a slight click as the connector locks in place.
REMOVAL: The DIMM is easily released from the socket by pressing both ejectors down.
CAUTION: DIMM insertion and removal should be done only when RAMCHECK LX is in STANDBY Mode. The RED "Module Power" LED should be OFF in STANDBY mode.