
This document is intended for users who currently own the DIMMCHECK 144P PRO with a PCB version earlier than version B and have purchased the item earlier than September 18, 1997. The modification involves cutting a trace on the DIMMCHECK 144P PRO PCB and soldering a small jumper wire to enable support on the SIMCHECK PLUS.
NOTE: This modification will allow SIMCHECK PLUS ver. 2.54 and above to support DIMMCHECK 144P PRO adapters that have been purchased before the above cutoff date. SIMCHECK II users do not need to perform this modification as the DIMMCHECK 144P PRO is readily supported on SIMCHECK II with ver. 1.25 and above.
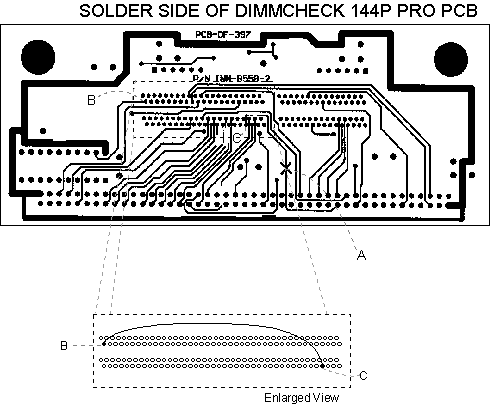
Please be sure that the DIMMCHECK 144P PRO adapter does not have VER. B printed on its PCB! Only earlier versions will need this upgrade. You should also verify that this upgrade has not already been performed.
The modification will remove the Output Enable line connected to the 90-pin connector, and reattach it to U1 of the adapter.
When viewing the DIMMCHECK 144P PRO from the solder side of the PCB, identify and cut the trace (Point A in Figure 1) leading away from pin 73 (point C) of the DIMM socket.
Next, solder a small jumper wire from pin 142 (point B) to pin 73 (point C) of the DIMM socket.
This completes your modification of the DIMMCHECK 144P PRO.